In this article, I’ll be reviewing one such social media scheduling tool — Publer. You’ll learn about its key features, ease of use, analytics, pricing plans, and customer support. By the end of this review, you’ll know whether or not Publer is the right social media scheduling tool for your needs. Let’s get started. Editor’s Note: To get the most out of this review, I’d highly recommend you sign up for Publer’s free plan. This will allow you to implement some of the action items discussed in this review and will help you evaluate some of Publer’s key features. Sign up for Publer’s free plan
Publer Review and Demo [Video]
Before we begin, you can check out my video review and walkthrough of Publer. This video gives you a top-level view of Publer’s key features and scheduling options. If you’d like a deeper analysis of all the features and pricing plans, scroll down to read the full review.
Publer Review and Demo [Video]What is Publer?How to Use PublerPubler Review: Key FeaturesSocial Media Scheduling OptionsPost PreviewHashtag Suggestion GeneratorSignatures and WatermarksPubler Review: Ease of UsePubler Review: AnalyticsPubler Review: Pricing PlansPubler Review: Customer SupportPubler Review: Publer vs Buffer vs Hootsuite vs SocialBeePubler Review: Final Verdict
What is Publer?
Publer is a social media scheduling tool that lets you post, schedule, and analyze your posts on all major social channels. With Publer, you can post and schedule your content on Facebook, Twitter, LinkedIn, Instagram, Pinterest, and Google My Business. You can even recycle and auto-schedule your posts to save time. Most social media scheduling tools offer a free plan. But what sets Publer apart from the other scheduling tools on the market is that its free plan gives you access to advanced features like Auto-Schedule, link shortening, post preview, and more. Publer’s free plan also offers higher limits. For instance, Publer’s free plan allows you to connect up to 5 social accounts, whereas tools like Buffer and Hootsuite let you connect a maximum of 3 social accounts with their free plan. But more on this in the pricing section…
How to Use Publer
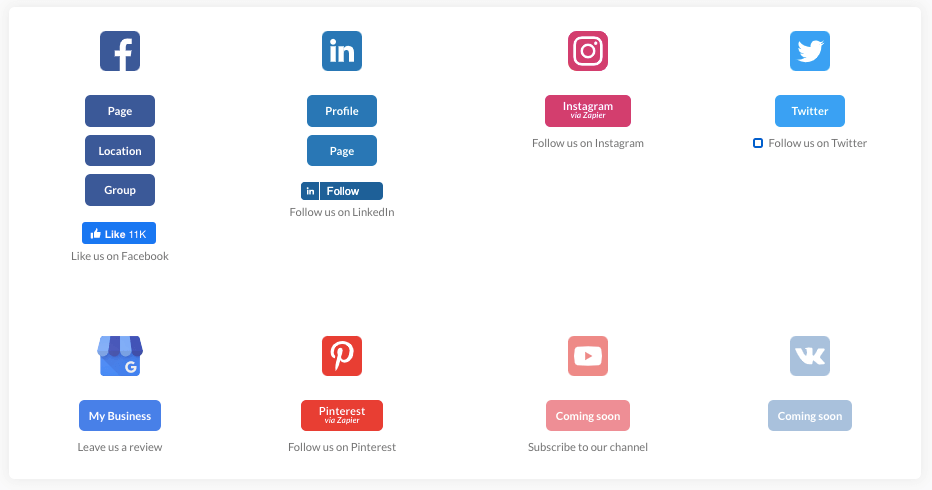
The first thing you need to do after logging into your Publer account is to connect your social accounts. It’s a simple process that won’t take much of your time. To add your social accounts to Publer, navigate to: Accounts > Add Account From here, select the social account that you’d like to add to Publer. You can connect your Facebook, LinkedIn, Twitter, and Google My Business accounts.
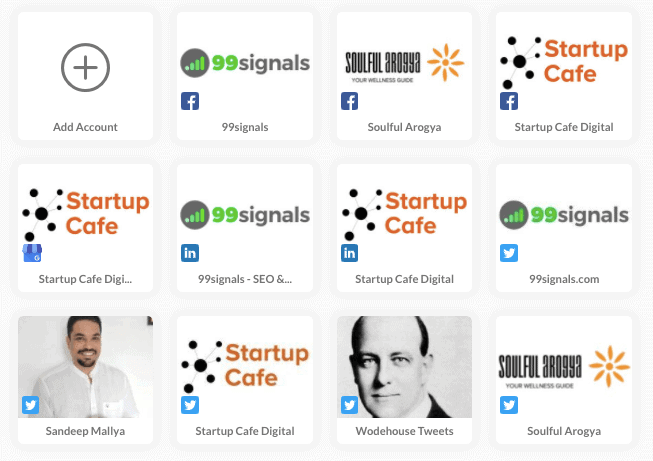
With Facebook, you have the option to connect your page, location, and group to Publer. Similarly, with LinkedIn, you can add both your profile and page to Publer. Based on your plan, you can connect multiple pages under each social network. Instagram and Pinterest can be integrated to Publer only via Zapier. You’ll soon be able to connect your YouTube and VK accounts. At the time of writing this review, these features are not live yet. Once you’ve added your social accounts to Publer, your Accounts page will look something like this:
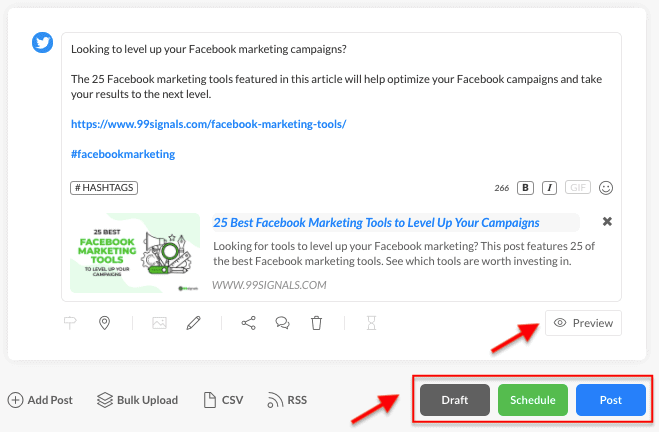
You can now start posting and scheduling your content via Publer. To do this, visit the “Create” tab, select the specific account, and start composing your post. Once you’re done composing, you can draft, schedule, or post your content to the selected social account.
Publer also provides you an option to preview your posts before you decide to post or schedule them on social media, but we’ll get to that in a bit. Next, let’s explore some of Publer’s key features.
Publer Review: Key Features
Social Media Scheduling Options
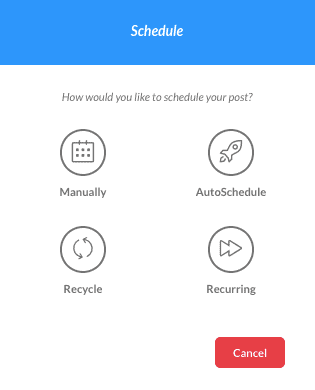
Once you’ve created your post on Publer, it’s time to post or schedule it using Publer’s scheduling options. If you’d like your post to go out instantly, just select the specific social account(s) and hit the “Post” button. Your post will be published without any delay. On the other hand, if you’d like to schedule your post, there are 4 ways you can do it — Manually, Auto-Schedule, Recycle, and Recurring.
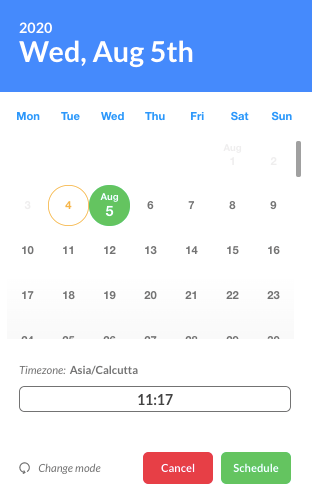
Let’s examine each scheduling option in detail. You can schedule your post manually by picking a date and time for your post to go live. It’s as simple as that.
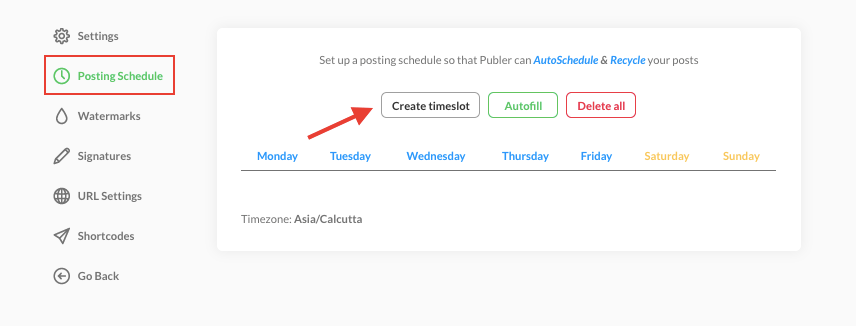
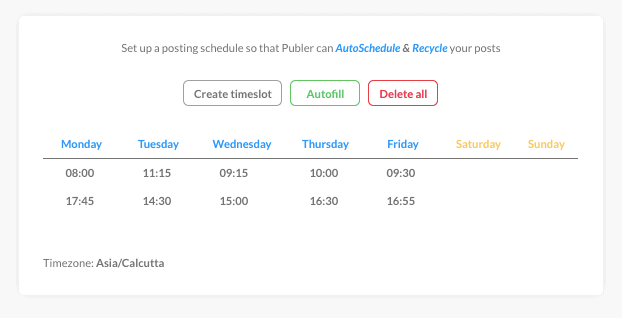
The next method is to auto-schedule your post. To select this option, you’ll need to configure a posting schedule for the specific account. To do this, visit the “Accounts” tab and select the account for which you’d like to set up a posting schedule. Next, click on “Posting Schedule” and hit “Create timeslot.”
Select the days and update the time slots for each day. Alternatively, if you’d like Publer to automatically fill the time slots for you, you can click on the “Autofill” button. When you’re done, your posting schedule should look something like this:
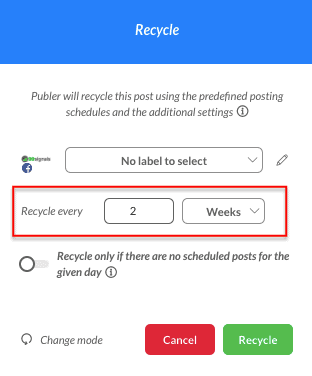
Once your posting schedule is set up, return to the post that you’d like to schedule and hit “AutoSchedule.” Your post will be automatically scheduled on the selected social account in the next available time slot. The next scheduling option is to recycle your posts. Publer gives you the option to recycle your posts every week/month/year.
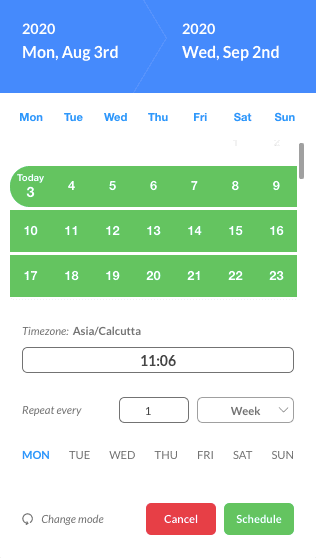
A super useful scheduling option if you have a lot of evergreen content on your blog. The next scheduling option is the recurring option. This is similar to recycling your posts, but you can set a start date and an end date and choose to repeat your post until the end date.
So these are the 4 ways you can schedule your posts on Publer. I personally use the AutoSchedule option to schedule my posts because it saves time and effort. You just have to set up your posting schedule once for each of your social accounts and simply hit the “Schedule” button every time you need to schedule something.
Post Preview
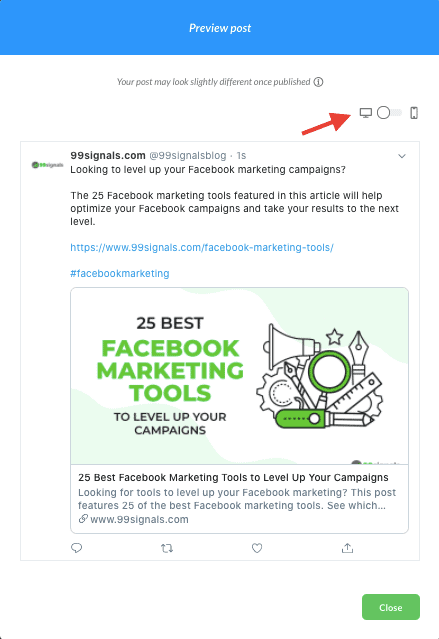
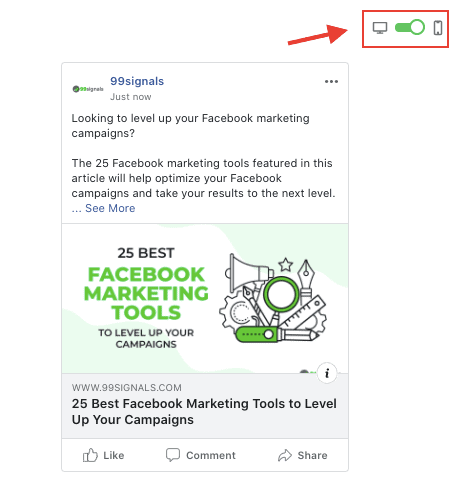
Publer allows you to preview each post before you post or schedule it on social media. Once you’ve composed your post, click on the “Preview” button. Publer will then show a preview of how your post will look on the selected social account when it’s live. You can see how your post will look on the selected social network’s feed on both desktop and mobile.
If for some reason, you’re not entirely satisfied with the way your post looks or spot an error while previewing it, you can make the necessary changes and craft it just the way you want.
Hashtag Suggestion Generator
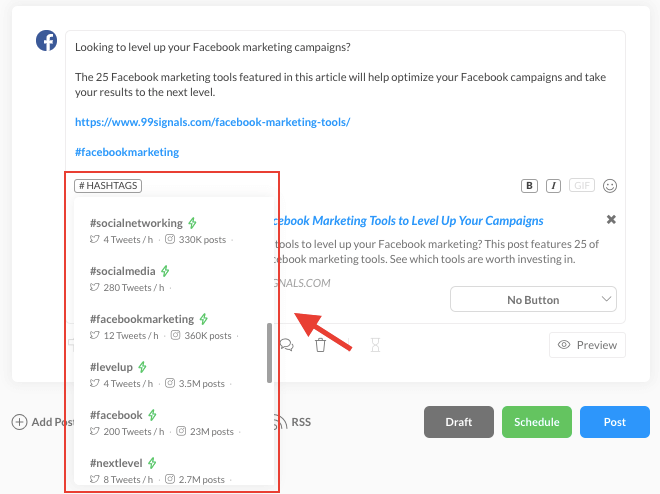
As the name suggests, this feature generates hashtag suggestions based on the content of your post. To use it, just click “#hashtags” while composing your post and you’ll see a list of relevant hashtags that you can include in your post. For instance, my tweet on “Facebook Marketing Tools” generated these hashtag suggestions:
Alongside each hashtag, you’ll get real-time insights into its engagement rate. Are hashtags just as popular as they once were? Certainly not. Are they still important? Most definitely! Case in point: In one study, Instagram posts with 9 to 12 hashtags received more engagement than posts with any other number of hashtags. Going by the current trends, hashtags seem to be more prevalent on Instagram than on Twitter, where their significance is declining. So use them sparingly while posting on Twitter. Publer’s Hashtag Suggestion Generator is a real time-saver as you don’t need to manually research the hashtags that you’d want to include in your posts.
Signatures and Watermarks
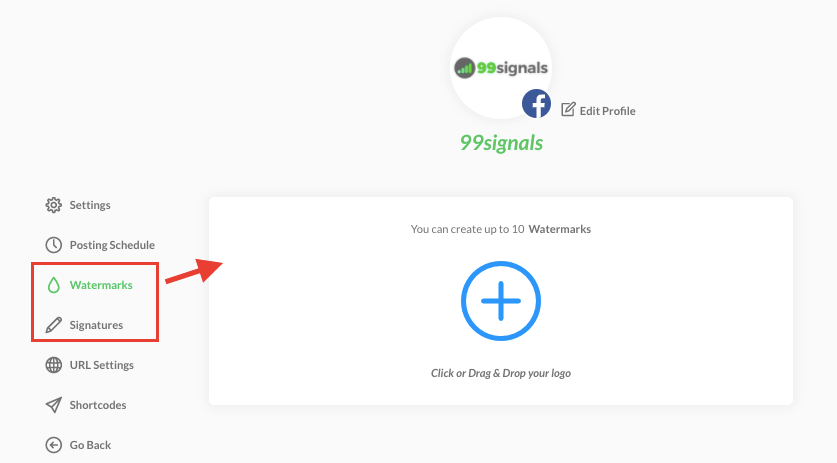
You have the option to add signatures and watermarks to each piece of content that you post/schedule via Publer (except posts on Twitter). If you want to enable these options, navigate to the “Accounts” tab and click on the specific account where you’d like to add a watermark or signature. To add a watermark, click on “Watermarks” in your profile settings and upload your logo. You can add up to 10 watermarks.
Similarly, to add a signature, click on “Signatures” and create your signature.
Publer Review: Ease of Use
Publer is insanely easy to use. From the setup process to post scheduling to post analytics, there’s nothing overwhelming about Publer. If you’re migrating from Buffer, your learning curve will be short and you’ll find lots of similarities between the UI of Buffer and Publer. Similarly, if you’re migrating from Hootsuite or SocialBee, both of which are slightly more complicated to use, you’ll be amazed at how quickly and effortlessly you can get the ball rolling on Publer. That said, Publer’s UI is far from perfect. It’s a bit rough around the edges and is too similar to Buffer. So I won’t be handing out any design awards to Publer just yet. But the UI is uncluttered, easy to navigate, and in the end, gets the job done. Bottom line: Publer combines the simplicity of Buffer and the finesse of SocialBee to offer a scheduling tool that’s just as robust as it’s easy to use.
Publer Review: Analytics
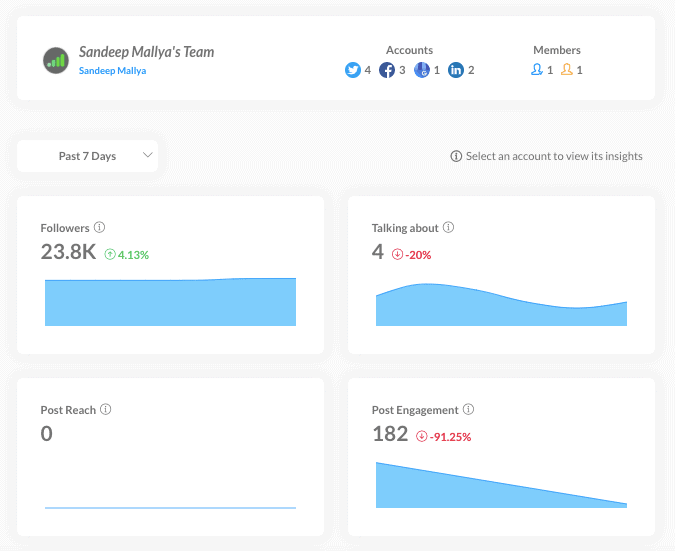
It’s not enough to maintain an active presence on social media. You also need to measure your performance from time to time to see which posts are resonating with your audience and which posts are being ignored. By default, Publer’s analytics report shows a summary of your performance across different social media channels over the past 7 days. You’ll see an increase/decrease in followers, page likes, post reach, engagement, and so on.
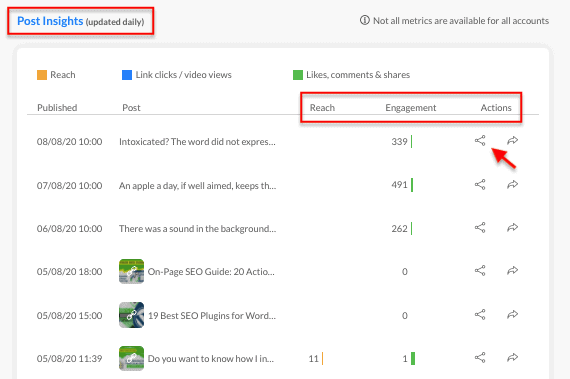
You can change the default view to reflect your performance for last week, this month, or last month. While you’re in the analytics report, scroll all the way down till you find the “Post Insights” section. Here you’ll be able to see the reach and engagement your individual posts received.
You can even decide to reschedule your posts by clicking the share icon next to the post. If you’d like to track performance for a specific social account, simply select the social account from the left side of your screen and your analytics report will be automatically updated to reflect the analytics of that specific account.
Publer Review: Pricing Plans
Publer offers 3 pricing plans – one free plan and two paid plans. The price of the paid plans varies based on the number of accounts and team members you opt for. For instance, if you’d like to connect 15 social accounts to Publer and add 5 additional team members, the monthly price of the Argentum plan would increase to $33/month and Aurum plan would cost you $57/month. This is the current pricing structure that Publer follows:
Free – $0/mo Argentum – $20/mo (for 10 social accounts and 3 users) Aurum – $36/mo (for 10 social accounts and 3 users)
Here’s a table that outlines features included in each plan: Publer’s free plan is perfect for anyone who’s trying a social media scheduling tool for the first time or switching from another scheduling platform. With the free plan, you can connect up to 5 social media accounts and schedule up to 50 posts. You’ll even get access to useful features like Auto-Schedule, post preview, link shortening, and more. So before you opt for a paid plan, I’d encourage you to sign up for the free plan and test some of the essential features out. Sign up for Publer’s free plan Publer’s Argentum plan unlocks additional features like watermarks, signatures, bulk scheduling, etc. and allows you to schedule unlimited posts. If you’d like to use Publer’s hashtag suggestion generator, you’ll need to upgrade to the Aurum plan. Visit Publer’s pricing page to learn more
Publer Review: Customer Support
The true strength of a business lies in how they resolve customer complaints, challenges, and pain points. I found Publer’s customer support team to be quite responsive and their help documentation covers almost all aspects of the tool. Publer provides customer support via chat, email, Facebook Messenger, and Twitter. To get in touch with the support team, click on the chat icon on the lower right corner of your screen. This will open up a chat window and you can send in your questions here. You can also contact them via FB Messenger by visiting their page on Facebook or get in touch with them on Twitter. But before you try any of these options, check out their help documentation. It’s quite comprehensive and there are high chances you’ll get all your questions answered there.
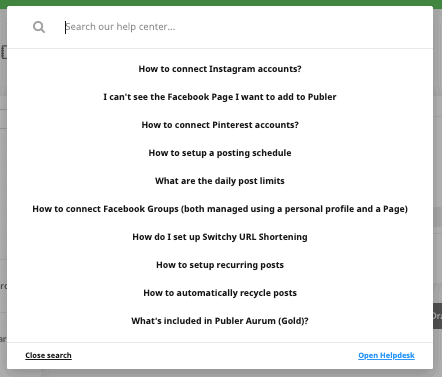
To access Publer’s help docs, just tap on the search icon in the chatbox. This will open up Publer’s help center where you can skim through the questions or type something specific to your problem in the search bar to see if you can find a solution.
Publer Review: Publer vs Buffer vs Hootsuite vs SocialBee
Here’s the thing: There are a ton of social media scheduling tools on the market. So it’s not easy to zero in on one tool when you’re so spoilt for choice. But quite frankly, the 3 tools that are dominating this space right now are Buffer, Hootsuite, and SocialBee. Check out any list of top social media scheduling tools, and chances are you’ll find all 3 tools featured prominently in the article. In this section, we’ll briefly compare Publer with three of its fiercest competitors. Functionality-wise, all of them offer basic scheduling features, but each one of them offers unique features that set them apart from the rest. For instance, Hootsuite offers social inbox, which allows you to interact with your audience across different channels by displaying private and public messages in one place. Likewise, Buffer offers Instagram tagging, which allows you to add your location and user tags while scheduling Instagram posts on Buffer, instead of manually adding tags after the post is published. Publer also offers features and advanced scheduling options that are unique to its platform. For instance, you can connect your Google My Business (GMB) profile to Publer and start scheduling posts to your account. Both Publer and SocialBee allow you to recycle your posts. The table below provides a quick glimpse of how Publer compares with Buffer, Hootsuite, and SocialBee: In terms of pricing, Buffer is the most affordable of the four. Buffer’s paid plans start from $15/month, where you can connect 8 social accounts and schedule 100 posts per account. But in terms of value, Publer easily beats all three of its rivals. Publer’s paid plans start from $20/month, where you can connect 10 social accounts and add 2 additional team members. Moreover, you can schedule unlimited posts and get access to advanced features like bulk scheduling, auto-schedule, post recycling, and more. And as mentioned earlier, Publer’s free plan offers more features and higher limits than the free plans offered by its counterparts. So if you were to use and compare the free plans offered by all these tools (except SocialBee, which offers no free plan), you’d get a lot more value from Publer. Sign up for Publer’s free plan
Publer Review: Final Verdict
Publer is an easy-to-use social media scheduling tool that provides you with multiple scheduling options, advanced features, and in-depth analytics. If you’re seeking an affordable social media scheduler that has all the essential features, you should definitely try Publer. If you signed up for Publer’s free account at the start of this review, you’d have tried some of the aforementioned features in real-time and scheduled a few posts to see how it works. If you’re still unsure whether to invest in this tool, I’d suggest you keep using the free version until the time you’re convinced this is the right scheduling tool for your needs. Sign up for Publer’s free plan If you found this Publer review useful, please share it on Twitter using the link below: Editor’s Note: This article was first published on 11 Aug 2020 and has been updated regularly since then for relevance and comprehensiveness.
25+ Places You Should Be Sharing Your Content 12 Best Social Media Scheduling Tools That’ll Help You Save Time OneStream Live Review: Live Stream Pre-Recorded Videos on Social Media 27 Best Facebook Marketing Tools to Level Up Your Campaigns SendFox Review: Email Marketing Tool for Content Creators
