In this post, I’ve created a list of five SEO tools that can help you on your journey to SEO success. Essentially these are the only tools you’ll ever need to improve the overall SEO of your website. So make sure you are having these tools in your marketing toolkit from day one. (Note: Aside from listing some of the key features of these tools below, I’ve also demonstrated a few cool ways you can use these tools to improve your search rankings. If you don’t have an active subscription to any of these tools, don’t worry! All these tools offer free trials, ranging from 3 days to 1 month. The only exception is Ahrefs which offers a one week trial for $7. I’ve provided links to free trials for each of these tools below, so please sign up for these trials and test out some of the features, and get the most out of this article.)
Top 5 SEO Tools You Should Be Using
1. KWFinder (for Keyword Research)
Keyword research is one of the most essential aspects of SEO. It’s important that you spend time creating content for keywords that your site has a realistic chance of ranking on page one. For most new bloggers and small business owners, this will mean they would need to target long tail keywords – specific keywords that get less search traffic, but have a higher conversion value. KWFinder is a cloud-based keyword research tool that helps you generate the perfect long tail keyword ideas in any niche. Just type in your seed keyword in the search box and KWFinder will return with a comprehensive report of up to 700 keyword ideas. It also provides a variety of information for each keyword, such as:
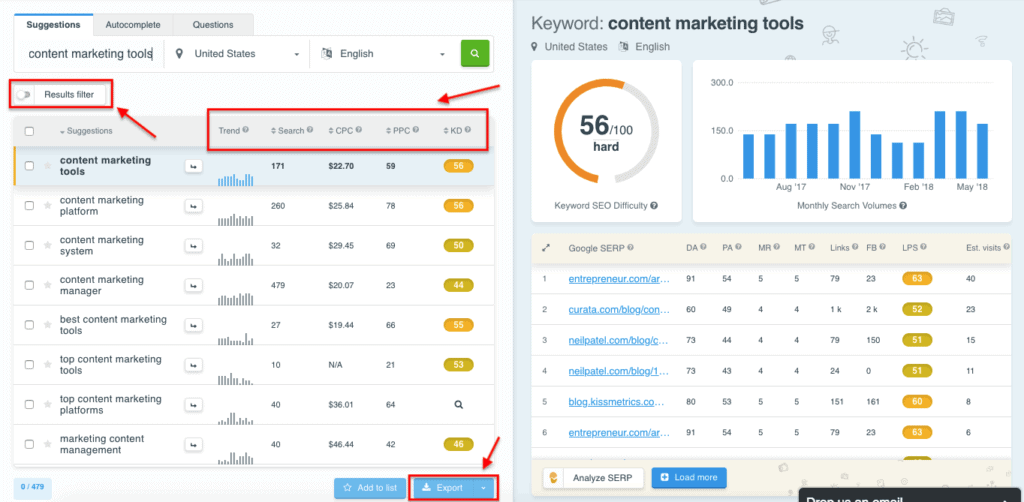
Search Volume Trend – search volume trend in last 12 months. Monthly Search Volume – average monthly search volume in the last 12 months Average CPC – average cost per click in Google Adwords PPC Competition – level of competition in PPC in Google Adwords. Keyword SEO Difficulty – calculated as the average Link Profile Strength (LPS) of URLs ranking in the 1st Google SERP.
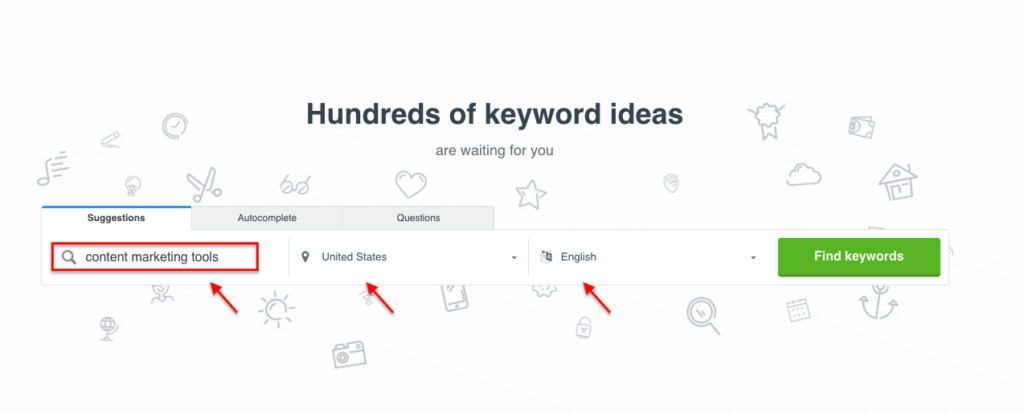
Click here to start using KWFinder for free (Free account includes 5 keyword searches/day and 50 keyword suggestions per search) To generate keyword ideas for your website, login to your KWFinder dashboard and type in your main seed keyword and hit the button “Find keywords” to start your keyword search.
In a few seconds, KWFinder will generate a comprehensive report which includes various keyword ideas for the seed keyword; along with information such as the five SEO metrics mentioned above. On the right side of the report, you’ll be able to view the Keyword SEO Difficulty of the seed keyword as well as a graph on its monthly search volume. Below that, you’ll see the top search results for the seed keyword and see top ranking pages for the target keyword. You can analyze these results to determine what strategy you need to use to beat your competitors in SERPs. KWFinder has gained a solid reputation in the SEO community since its launch in 2014 and is now part of the Mangools product suite which also includes 3 other tools –SERPChecker (Competitor analysis tool), SERPWatcher (Rank tracking tool), and LinkMiner (Backlink analysis tool). If you’ve never tried KWFinder before, I highly recommend you sign up for the free version of the tool which comes with a limit of 5 searches/day and 50 keyword suggestions per search. Click here to get started with KWFinder KWFinder Pricing With KWFinder, you’re essentially getting 4 SEO tools for the price of one as it’s part of the Mangools product suite. The 3 other tools in the package are SERPChecker, SERPWatcher, and LinkMiner. Here are the pricing plans if you decide to opt for annual payment.
Mangools Basic – $29.90/mo Mangools Premium – $39.90/mo Mangools Agency – $79.90/mo
By opting for an annual package, you can save up to 40% on your total bill. The basic plan comes with 100 keyword searches/day and 200 keyword suggestions/search. If you are a solopreneur or blogger who just manages one website, then the Mangools Basic plan should be adequate for your needs. To learn more about this SEO tool, check out my in-depth review of KWFinder.
2. SEMrush (for On Page and Technical SEO)
I’ve featured SEMrush time and time again on this blog, and here’s why: it’s undoubtedly one of the best SEO tools in the market, packed with tons of features to help you achieve SEO and content marketing success. I know this list is already narrowed down, but if we were to narrow it down even further to just one SEO tool, then this would be it. SEMrush is perhaps the most well-known and admired SEO software in the market. It’s the preferred SEO and content marketing tool for SEOs and marketers all around the world, used by over 1 million users. Here are just a few of the things you can do with SEMrush:
Identify your organic competitors Get insights into your competitors’ organic strategies See your competitors’ best ranking keywords Conduct a deep link analysis Check backlinks’ types Find the right keywords for your SEO campaigns Gather phrase matches and related keywords Track your positions for any keyword
But there are two tools within SEMrush that I use more than others. They are:
Site Audit – to identify technical SEO issues with your website and fix them promptly. On Page SEO Checker (formerly called “SEO Ideas”) – to identify on-page optimization opportunities to improve the overall visibility of your web pages in SERPs.
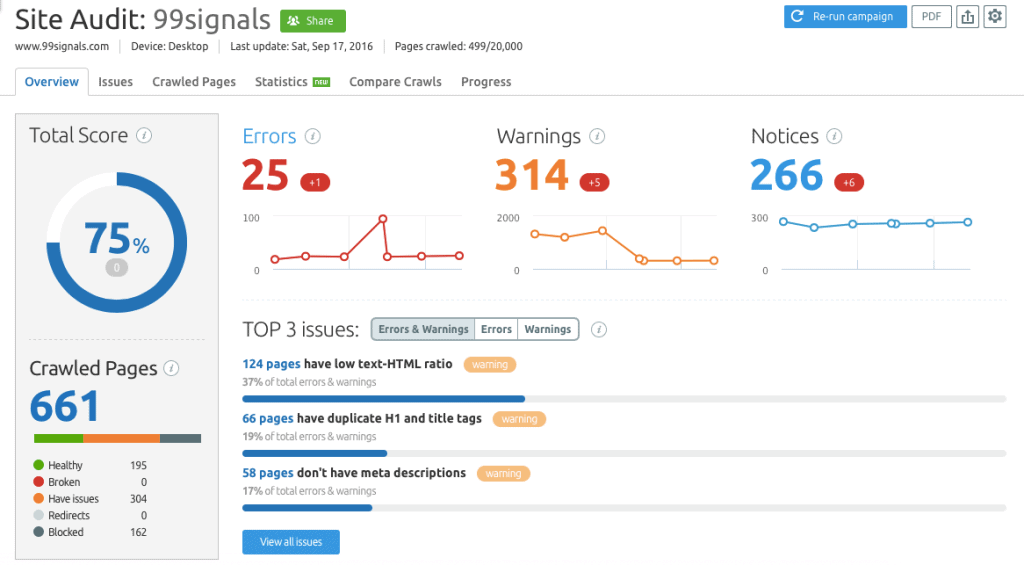
If you use these two tools regularly (i.e. at least once a week), you’ll never have to worry about on-page and technical SEO ever again. So let’s dig deeper into how you can make the most of these two tools to optimize your rankings. Note: If you’d like to try out these features below, you need to have an active SEMrush account. If you don’t, you can sign up for a free SEMrush Pro trial for 14 days by clicking the link below. Sign up for a 14-day trial of SEMrush Pro Site Audit The Site Audit tool can help you identify technical SEO issues with your website and highlight steps and recommendations you’ll need to follow to fix these issues. To run a site audit for your site, login to your SEMrush dashboard, navigate to Projects and click on Add New Project to enter your domain. Next, click the Set up button under Site Audit to open a new settings window. Enter all the details here and hit Start Site Audit. The SEMrush bot will crawl your website and generate a report on all the on-site errors you need to fix in order to obtain a higher health score. The total health score of the website is based on the ratio of found issues to the number of performed checks.
The technical issues on your site are organized into 3 categories:
Errors (shown in red) – These are the issues that are of the highest severity and therefore, should be fixed immediately. These errors can be broken links on your website, sitemap errors, robots.txt errors, duplicate content issues, etc. Warnings (shown in orange) – These issues are of medium severity. Examples include duplicate title and H1 tags, images that don’t contain alt attributes, internal links that contain nofollow attributes, missing meta descriptions, etc. Notices (shown in blue) – These are minor issues. Examples include external links that contain nofollow attributes, pages blocked from crawling, orphaned pages in sitemaps, etc.
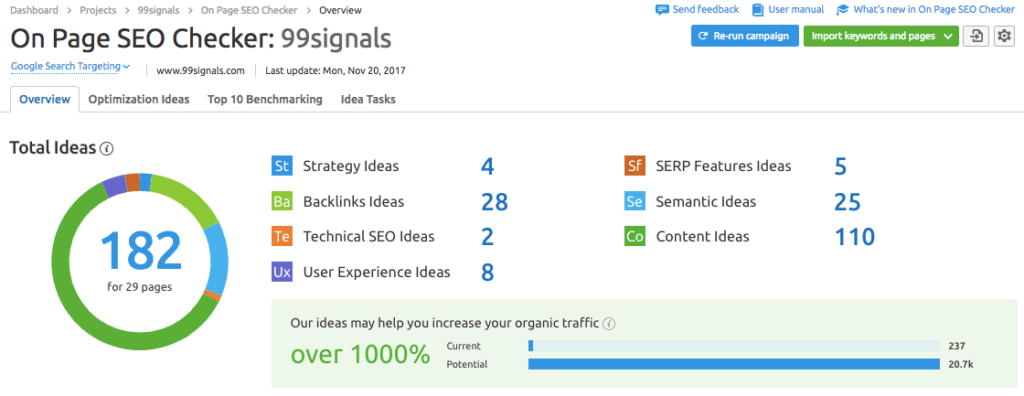
Below the errors, warnings, and notices, you’ll see the top 3 issues from your audit. Click on any of these issues to see the list presented in the Issues tab of the report. In the Issues tab, you’ll see a detailed explanation of all the issues and the steps you need to take in order to fix them. Errors will have a higher impact on your total health score than warnings, but both should be addressed to improve your site’s health. So run a site audit every week and fix any issues as and when they occur. A health score of 85% and above should indicate there are no technical SEO issues with your website. On Page SEO Checker The On Page SEO Checker suggests precise optimization ideas to improve the search visibility of web pages on your site based on what your competitors are doing to rank ahead of you. You can use On Page SEO Checker to optimize the existing blog posts or other important landing pages on your website. The On Page SEO Checker is a project tool, so in order to use it, you’ll need to create a new project for your domain if you haven’t already done so. Once you’ve done that, go to the projects dashboard to start your On Page SEO Checker campaign. In a few seconds, SEMrush will generate a report that will list all the optimization ideas the tool has gathered to improve your website’s on page SEO. You’ll also be able to view the current organic traffic your web pages are receiving and the potential traffic you can expect by implementing the ideas recommended by SEMrush.
If you scroll down, you’ll see the top web pages you need to optimize in order to rank higher in SERPs.
The pages that are targeting the most volume of search will be at the top. To see all of your ideas, click on “View all pages and ideas” at the bottom. To see recommendations for a specific page, click on one of the green buttons next to that landing page. SEMrush will pull out the Optimization Ideas report and suggest improvements to your overall strategy, content, usage of semantically related words, backlinks, technical issues, and user experience. So these are just two ways you can use SEMrush to push your site to the top position of search results. SEMrush Pricing SEMrush offers three pricing plans. All three plans include 28 advanced tools and features to boost your marketing:
Pro – $99.95/mo (Ideal for beginners and bloggers) Guru – $199.95/mo (Ideal for small business owners and solopreneurs) Business – $399.95/mo (Ideal for marketing agencies and marketing teams in big companies)
All three are recurring subscriptions. You can upgrade or downgrade your plan at any time, or cancel your subscription at any moment. For a detailed feature comparison of all three plans, check out this page. To learn more about how you can leverage SEMrush for SEO, content marketing, and PPC, check out my in-depth review of SEMrush, or just sign up for a 14-day free trial of SEMrush PRO to test out all the features yourself. More SEMrush Resources
SEMrush vs MOZ: Which is the Best SEO Tool? 5 Best SEMrush Features for Bloggers How to Use SEMrush to Amplify Your Content Marketing SEO Tools Showdown: SEMrush vs Ahrefs vs Moz Pro vs SpyFu How to do Competitor Analysis with SEMrush [A Detailed Guide]
3. Ahrefs (for Backlink Analysis)
Ahrefs is simply one of the best backlink analysis tools in the market which can not just provide an accurate backlink profile for any website, but also help you build new backlinks and disavow toxic backlinks. Ahrefs has the fastest backlink crawler in the industry and boasts the world’s biggest index of live backlinks (over 15 trillion links), making the best tool for backlink analysis. Ahrefs’ Site Explorer is perhaps the most popular and widely used tool in the Ahrefs suite. You’ll be primarily using this tool from Ahrefs to analyze and research backlinks. Here are some of the things you can do with Ahrefs’ Site Explorer:
Organic traffic research – See what keywords your competitors are ranking for and which pages bring them the highest traffic from search. Backlink checker – See which websites are linking to your competitors and gauge the quality of their backlink profile. Paid traffic search – Learn whether your competitors investing in PPC ads and where they funnel their paid traffic. Research pages – The section of the Site Explorer report called “Pages” allows you to quickly find out which pages on a target website have the most backlinks and social shares. Research outgoing links – The section called “Outgoing Links” in the report will give you an idea of a target website’s linking patterns – what websites they link to the most, which anchors they use, and if any of their outgoing links are broken.
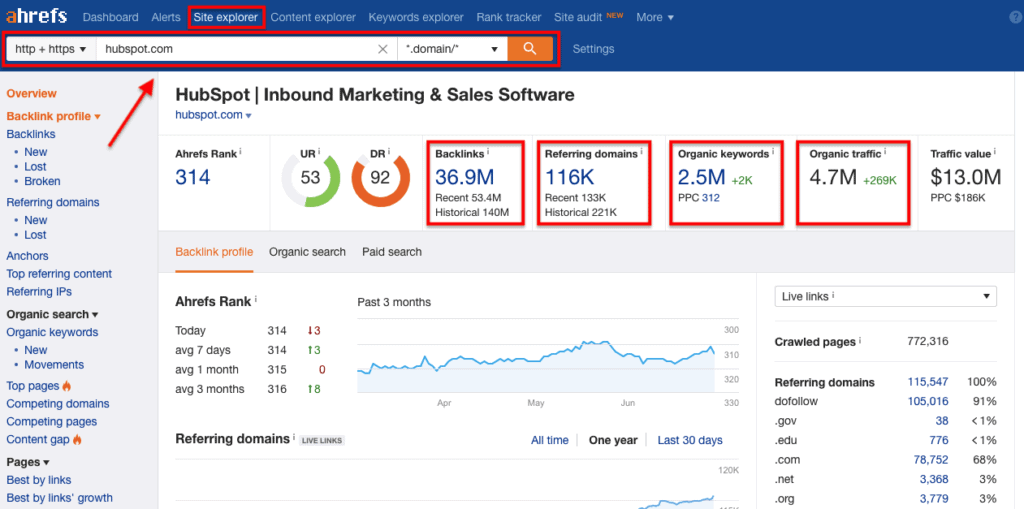
Ahrefs doesn’t provide a free trial anymore, but you can sign up for a 7-day trial for $7. This trial will give you full access to all its tools and features. Click here to start your 7-day Ahrefs trial for $7 To get the most out of the next section, make sure you have an active Ahrefs subscription. Ahrefs’ Site Explorer Ahrefs’ Site Explorer gives you an in-depth look at the backlink profile and search traffic of any website or URL. Using this tool, you can learn more about your own website or take a sneak peek into your competitors’ backlink profile to plan your link building strategy. To get started, type in a URL into the Site Explorer search box to view your target website’s total number of backlinks, organic keywords, organic traffic for those keywords, paid keywords, and also see important SEO metrics such as URL rating, domain ratings, and Ahrefs rank.
When you scroll down, you’ll find other useful information such as:
Referring domains and pages pointing to your website New and lost referring domains New and lost backlinks CTLDs (Country Top Level Domains) distribution Anchors cloud, anchor phrases and terms
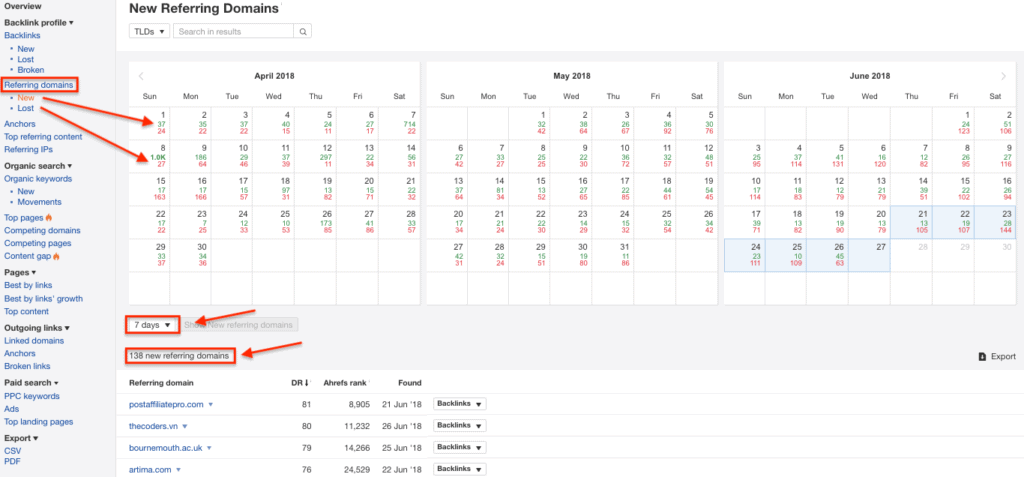
Checking Backlinks for Any Website From the Site Explorer results, you can click on “Referring domains” to access a report that lists all the websites linking to your target website or URL.
You can view the new/lost/broken backlinks and referring domains of a site, view all its anchors, and top referring content and IPs. Scroll down and select a date range to check out all the new referring domains gained in that duration. Ahrefs Pricing The prices for Ahrefs start from $99/month or $82/month if you choose to pay annually. Ahrefs offers four monthly pricing plans:
Lite – $99/month Standard – $179/month Advanced – $399/month Agency – $999/month
If you’d like to use Ahrefs to manage just one website, then the Lite plan should be sufficient for your needs. If you’re managing multiple websites, then the limitations of the Lite plan may hold you back. In that case, upgrade to the Standard plan which allows you to track more keywords and backlinks. And if you run an agency where you manage multiple clients’ websites, then you’ll need to upgrade to Advanced or Agency plan depending on your requirements. Over the last few years, Ahrefs has evolved into a complete SEO product suite that is capable of doing much more than backlink analysis. Check out my in-depth review of Ahrefs to learn more about the tool’s features and functionalities.
4. Moz Local (for Local SEO)
If run a local business and you haven’t yet paid much heed to local SEO, here are some reasons why you should:
46% of all searches on Google are local 88% of consumers trust online reviews as much as personal recommendations. 78% of local-mobile searches result in offline purchases
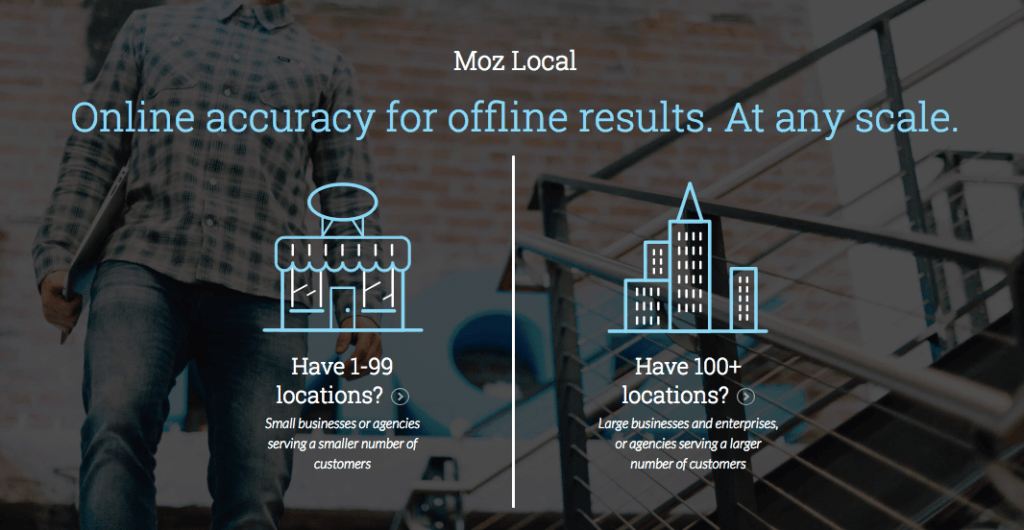
If you aren’t convinced yet, take a look at this HubSpot infographic on the importance of local SEO. Moz Local, developed by Moz, is one of the most popular local SEO tools in the market. It helps you boost the local visibility of your business and ensures that your business listings are correct, consistent, and visible across the web. Among other things, Moz Local submits accurate location data of your business to all the major data aggregators and online directories and helps you close duplicate business listings and lets you easily update your business listings. Here’s what you get with an active subscription of Moz Local:
Location Data Management: Moz lets you actively manage your location data to optimize performance in local search. SEO & Local Ranking Analytics: You get thorough analytics data to improve your local marketing performance, helping you make informed decisions based on what’s working. You can also measure improvement toward your local ranking goals with easy comparisons to your competitors. Success Assurance: You’ll have access to a Customer Success Manager who’ll oversee your Moz Local account and provide local SEO insights to help you achieve your local search goals. API Access: With the API access, you can build your own dashboards with Moz Local data, and integrate Moz’s metrics with your internal and external reporting tools. Reputation Management: Moz lets you monitor and manage the latest reviews on the most popular sites without having to visit them all individually.
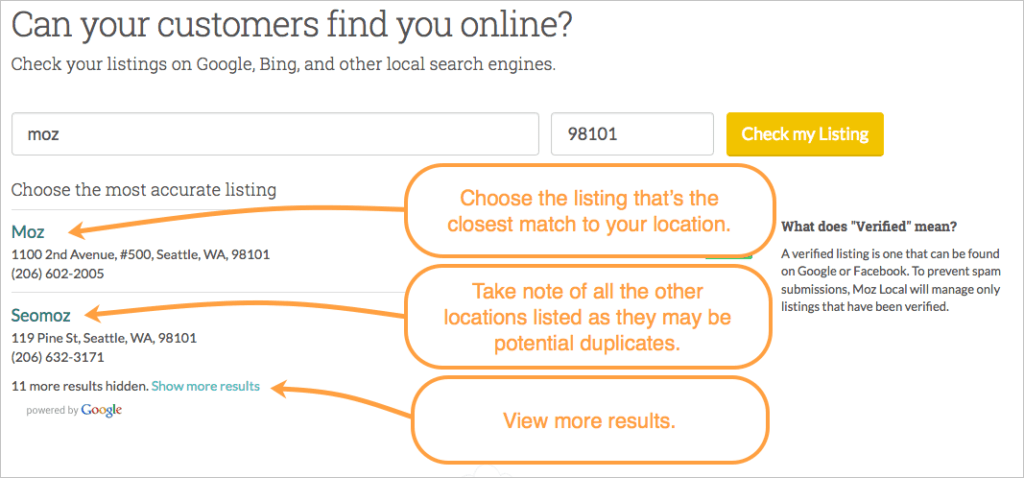
Luckily, Moz offers a free 30-day trial for Moz which includes access to Moz Local. Click here to start your free trial. The first thing you should do after signing up is to check the listing of your business. Login to your Moz Local dashboard, type in your business name and postal code in the search bar, and then click on the “Check my Listing” button.
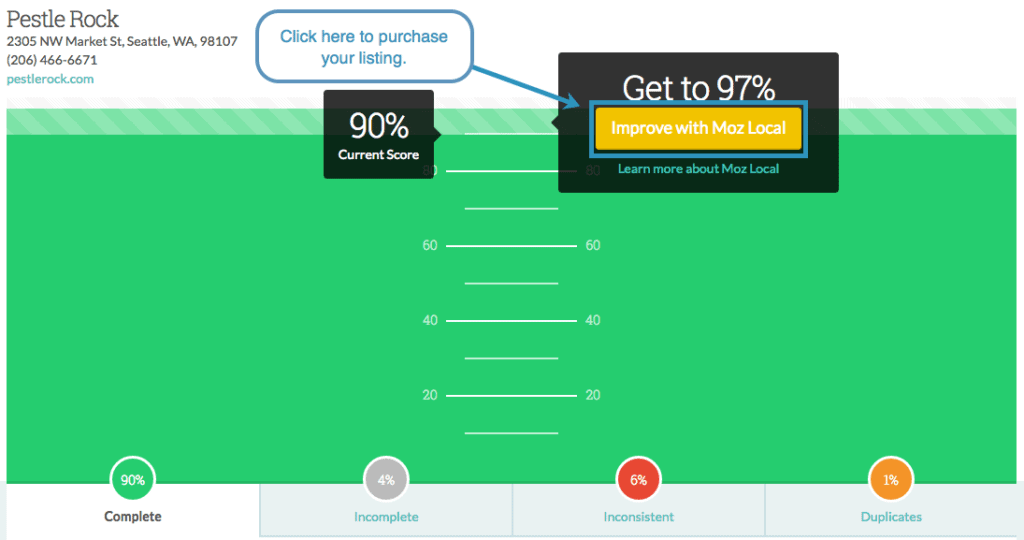
Image Credit: Moz Moz will then ping Google for all the closest matches they can provide. In majority of cases, you’ll see multiple results. You need to focus on closest matches that have the green ‘verified’ icon next to them. A verified listing means that Moz has found a matching listing on either Google Maps or Facebook Local that validates the location is real. Click on the listing that’s the best fit for your location. You’ll then be taken to a page that will list your business name, address, and phone number. The chart below will have your listing score which is an aggregate of how accurate Moz finds your listings to be based on what you’ve claimed, what you haven’t claimed, any duplicate listings, and address inconsistencies. This will give you a fair idea of how healthy your listing is already and how much work you need to do.
Image Credit: Moz Click on “Improve with Moz Local” button to purchase and manage your listing through Moz Local. To learn more about purchasing a listing on Moz Local, check out this comprehensive guide. Next, you need to connect your Google My Business (GMB) account with Moz Local. By doing this, you’ll allow Moz to automatically associate your GMB listings with your Moz Local listings. With this feature you no longer have to manage locations in both Moz Local and GMB. You can manage all your local data from a single dashboard without ever visiting GMB again.
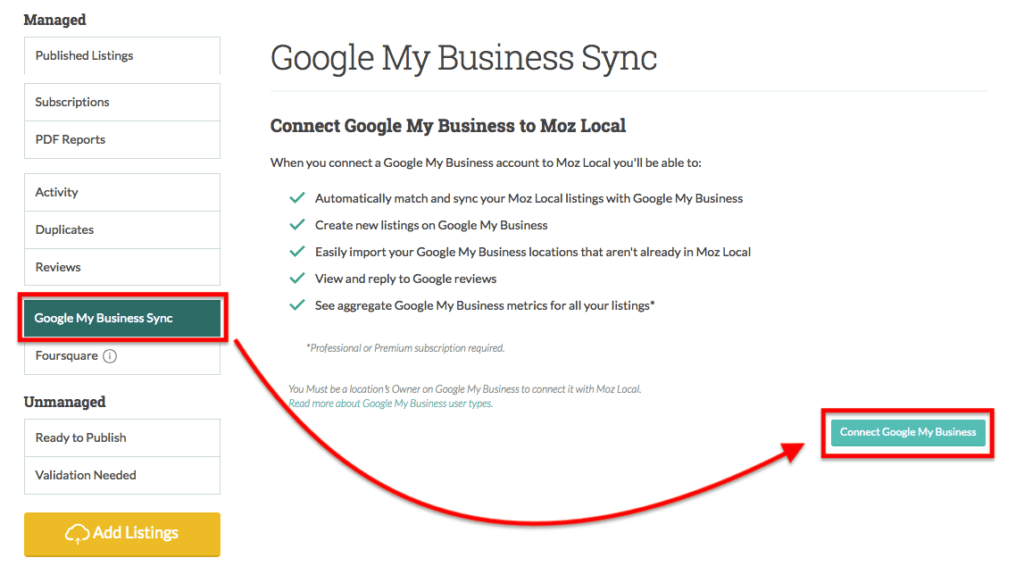
To connect your GMB account with Moz Local, head over to “Google My Business Sync” tab from your Moz Local dashboard. Then click on “Connect Google My Business” button to add a new GMB account.
The main page is divided into four tabs:
Synced – Here, you can see locations currently in both GMB and Moz Local. This tab enables you push updates from Moz Local to GMB. Unsynced – Locations here are published in Moz Local but are not currently in GMB. You can push these to GMB if you’d like. Import – Here you can import locations that exist in GMB that you have not published in Moz Local. You can import these into Moz Local if you’d like. After clicking the Import button, the new locations will appear in either the “Ready to Publish” or “Validation Needed” tabs. Action Required – Here you’ll find locations that cannot be imported into Moz Local, either because they are unverified or lack owner permissions on GMB. In order for them to be imported into Moz Local, you’ll need to fix their issues directly on Google My Business.
Click on the “Performance” tab to analyze data from your Google My Business account. This will help you get a better understanding of consumer behavior which helps you optimize your business listings. Moz Local Pricing Moz Local has three pricing plans:
Essential – $99/year (ideal for small and medium-sized businesses) Professional – $179/year (ideal for agencies and enterprises) Premium – $249/year (ideal for agencies and enterprises with a bigger budget)
For a detailed comparison of features of all three plans, check out this page. Click here to get started with Moz Local
5. Ninja Outreach (for Blogger Outreach)
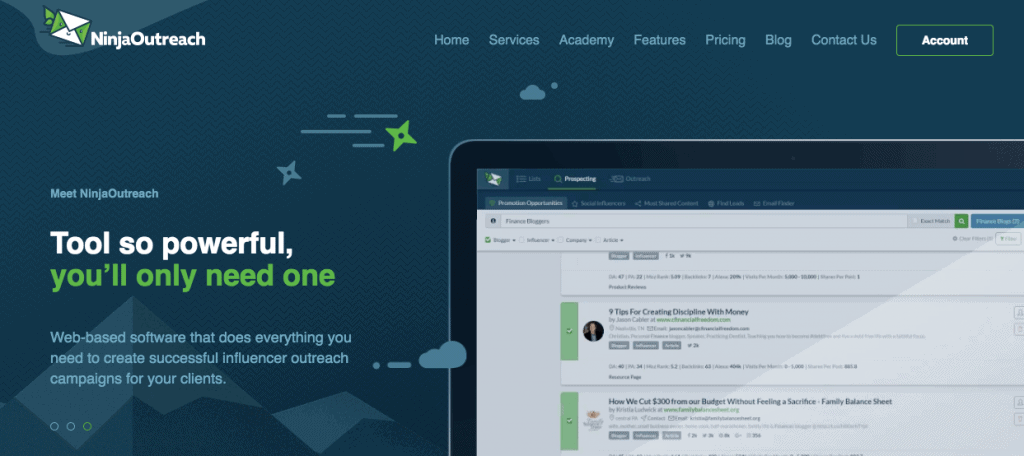
If you’re serious about building backlinks for your website, then you need to do blogger outreach from day one. And if you’d like to implement an effective outreach strategy for your website, then you can rely on a tool like Ninja Outreach. Ninja Outreach is a web-based software that helps you create successful influencer outreach campaigns. With a database of over 25 million websites, you can find the right influencers in any niche and country. In regards to blogger outreach, here are some of the things you can use Ninja Outreach for:
Collect contact information from Google results using Ninja Outreach’s browser extension Find influential guests for your podcast, interview, or blog posts Get featured on interviews and podcasts Find affiliates for your products Find top bloggers and journalists to generate positive buzz around your product/website Get backlinks with infographics and guestographics Find the most shared posts and who shared them Do broken link building Get backlinks on resource pages of high DA websites Generate leads for your business Get product reviews, guest posts, sponsored posts, and giveaways Promote your content Promote your crowdfunding campaign
Here are some of the key features on Ninja Outreach that will help you achieve these above goals:
All-in-One Social Media Influencer Search & Outreach Tool: With this tool, you can find Instagram and Twitter influencers in any niche and country. Personalized Influencer Outreach Messages: Ninja Outreach provides you with tons of outreach email templates which you can customize to deliver the right message to the influencers. Analytics and Automation: You can automate your email sends and track stats such as open rate, click-through rate, and reply rate. Find Any Email: The Email Finder tool allows you to find anyone’s email address just by giving a search for the specific domain. Your Very Own Outreach Inbox: Ninja Outreach includes an in-app inbox which syncs with your email client to copy relevant prospect conversations, making it super-easy for you to view your influencer outreach history and follow up.
Here I’ll share a technique you can use to build backlinks from resource pages using Ninja Outreach. If you don’t have an active Ninja Outreach subscription yet, you can sign up for a 3-day free trial by clicking the link below: Sign up for a 3-day free trial of Ninja Outreach Backlinks from resource pages on top authority websites are extremely valuable. Most bloggers maintain a page where they list all their favorite resources. Here’s our resources page for reference. Resource page link building is the process of looking for high-authority resource pages relevant to your niche. Once you identify a resource page that’s relevant to your niche, you send the website owner a pitch to add your website/app/software to their list of resources, which means you also get a backlink. Ninja Outreach makes it easier to identify authoritative resource pages in your niche and get high-quality backlinks. Login to your Ninja Outreach dashboard and navigate to Search -> Find Leads. Enter your main seed keyword and hit Search. Next, click on Filter -> All Featured Pages, and choose Resource Page. This will filter the results to show only the resource pages of various websites.
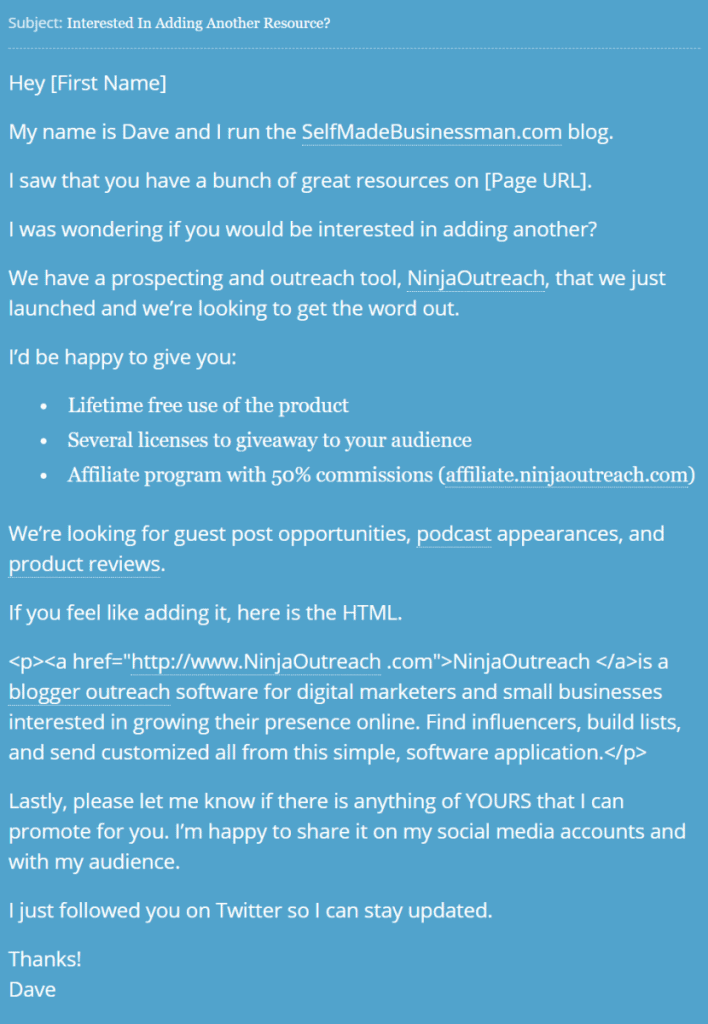
Once you find what you need, you can save all the prospects in a new list. Once you’ve finalized the prospect list, it’s time to launch your outreach campaign. There are several outreach templates within Ninja Outreach which you can personalize and send to all the contacts saved in your list. Here’s an example of a script used by the Ninja Outreach team for resource page link building:
Image Credit: Ninja Outreach When done the right way, resource page link building can be a great 80/20 link building strategy and Ninja Outreach can help you build authoritative backlinks in no time. Ninja Outreach Pricing Ninja Outreach has four pricing plans. All plans include unlimited searches, emailing and campaigns:
Solo – $52/mo (Fuss free starter plan for a single user) Pro – $75/mo (Comprehensive outreach plan built to support small businesses) Pro+ – $187/mo (Advanced outreach plan for professional marketing outreach) Enterprise – $599/mo (Accommodates a big team of marketers looking for tons of data storage)
For a detailed feature comparison of all four plans, check out this page. The Pro plan is the most popular plan wherein you can add up to 5000 contacts, get unbranded emails, and get access to NinjaBot – your very own automated influencer outreach assistant. You can test drive any of the above plans for 3 days by clicking on the link below. Click here to start your 3-day free trial of Ninja Outreach
Conclusion
With higher search rankings, you receive more clicks, leads, and customers. Sadly, there is no shortcut to pushing your website to the top of search results. If you want to increase your search traffic, you need to run several SEO experiments and use the right tools. The five tools featured here are packed with features, relatively easy to use, and provide you with data that can help you gain an edge over your competition in search result pages. So make sure you include them in your marketing toolkit. What do you think of these SEO tools? Do you have a favorite tool that’s not featured in this list? Please share your thoughts in the comments below. If you found this article useful, please share it on social media using the social bar on the left or share it on Twitter using the link below: [ctt template=”5″ link=”larFU” via=”yes” nofollow=”yes”]The Only 5 SEO Tools You Will Ever Need[/ctt]
How to do Competitor Analysis with SEMrush [A Detailed Guide] How Long Should a Blog Post Be? Here’s What You Need to Know 5 Best Blogger Outreach Tools to Find and Connect with Top Influencers 14 Best Google Chrome Extensions for SEO 40 Infographic Submission Sites to Promote Your Infographic (and Get Backlinks)

